Norms Restoration - 31 Seater Projects
1952 AEC Regal III [2547]
2021
Body May
Norman Julian 1st May
Now that I can see the light at the end of the tunnel, I can safely say what has been done to this vehicle.
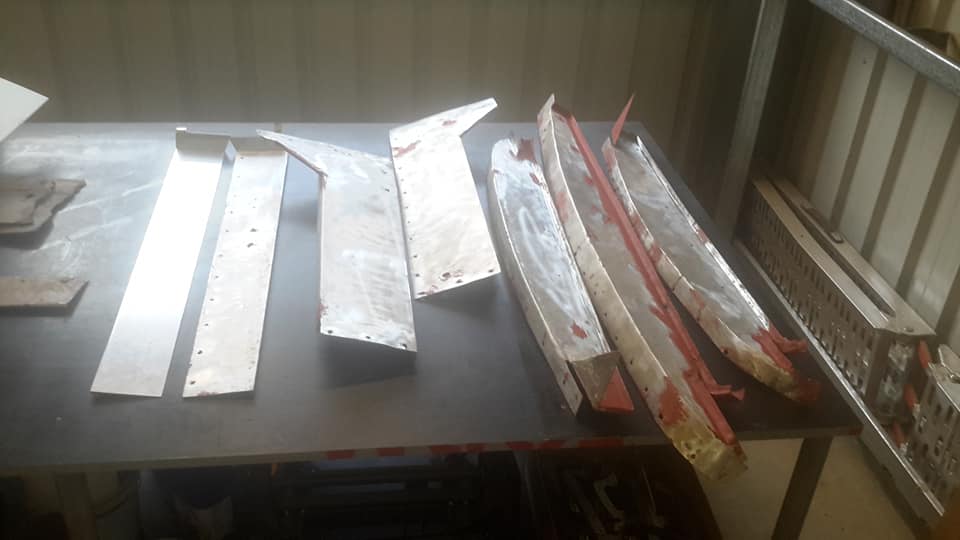
Approximately 35% of the frame has been replaced. No roof bows have been damaged by rust, though the roof had to be raised in one area.
100% of the glass has been replaced. 95% of all rubber will be replaced. All aluminium flat skin has been replaced.
Apart from the egg shell panels the roof will be replaced. The internal ceiling sheeting will be stripped of paint and reused.
The radiator shroud was replaced and rechromed. The whole chassis was stripped and repainted. The battery box was rebuilt.
All the air lines have been replaced. The mechanicals around the driver as in hand brake lever, gear changer foot pedals were all taken off and serviced.
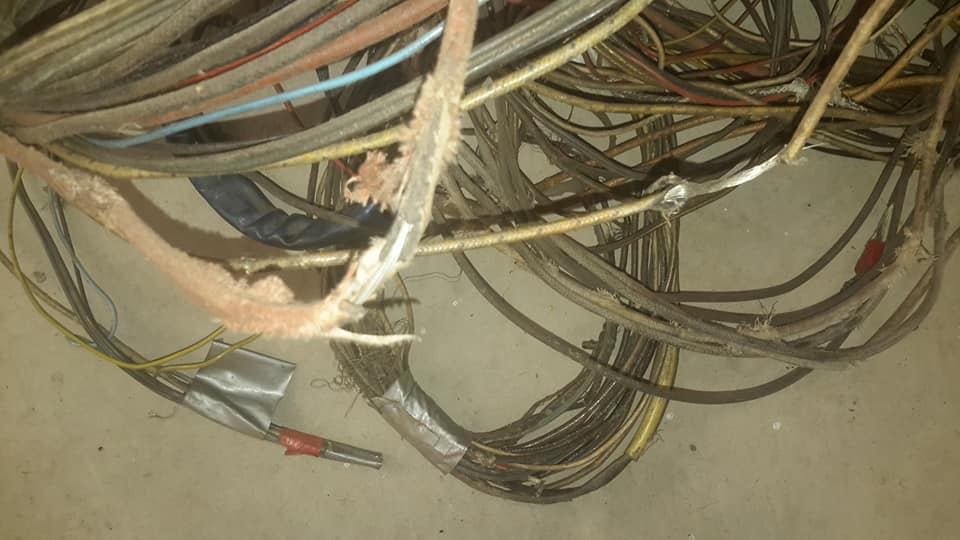
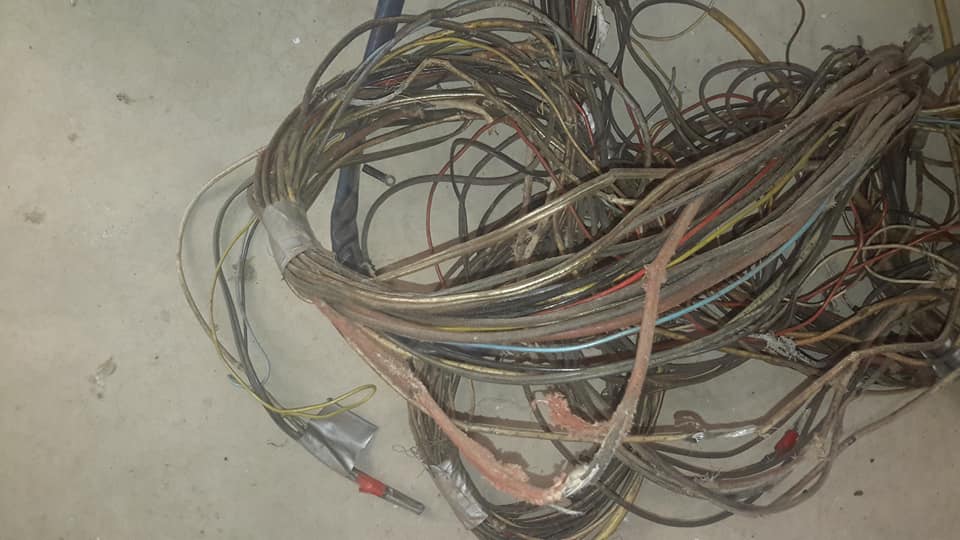
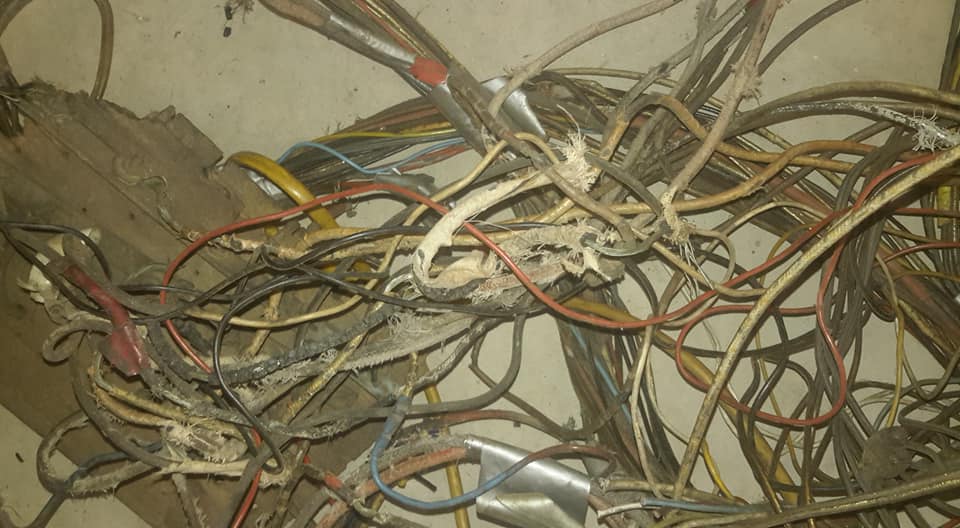
All the wiring was replaced.
Most of the route number scrolls were replaced with calico type.
New flooring and new stair cases.
Everything except the engine, gearbox and diff was taken off and serviced and painted. Waterpump stripped and rebuilt.
There are things I can't think of.
John Clarke
WOW! I can't wait to see the finished product.
Norman Julian
Just adding to that the 2 jacknife doors where stripped down to their bare bones, inspected and painted and then rebuilt using new glass but I reused the rubber. It wasn't too bad.
Pablo E. Laredo
90% done 90% to go as they say. Champion effort in getting it done.
Gregor Neil Robertson
In the old days men left great cathedrals behind them. You leave buses.
Greg Gibson
Great work Norm I’m enjoying watching from the side lines. Please build a force 7 replica before you hang up your hat
Bryce Pender
May be an image of text that says "A PESSIMIST sees a dark tunnel An OPTIMIST sees light at the end of the tunnel A REALIST sees a freight train
The TRAIN OPERATOR sees 3 idiots standing on the tracks... -Unknown boardofwisdom ifunny.co"


Graham Inskip
Shrink wrap works wonders.
Garry Macoid
Nice work Norm, lucky its all coloured, my Reliance has complete original loom made using beige wire for every circuit.😭😭😭
Ben Summers
After looking at these images Norman, I'm going to leave the wiring on 2775 to a professional!
Graham Inskip
Ben well at least some pictures would be a help to see how far you have got...have you got rid of that bullbar yet?
Ben Summers
Not yet Graham; I have no experience using an angle grinder.
Hugh Esler
Doing well there Norm. After this wiring resto you can start on Star Ship Enterprise 🧐🤓🤓
Norman Julian 21st May
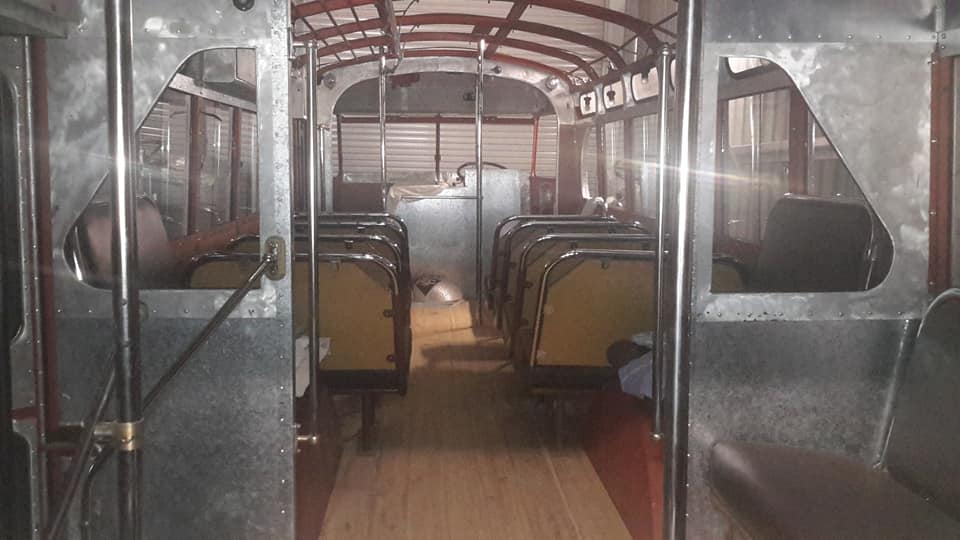
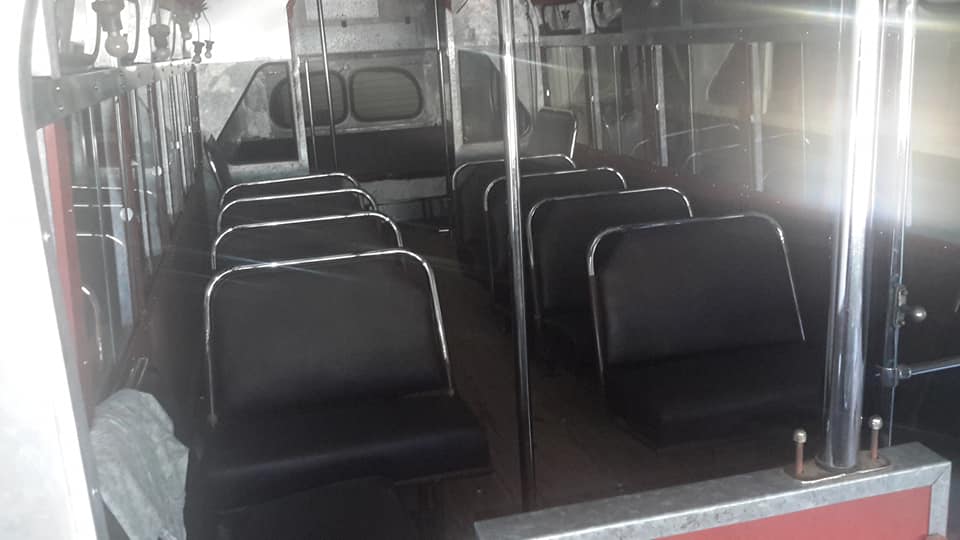
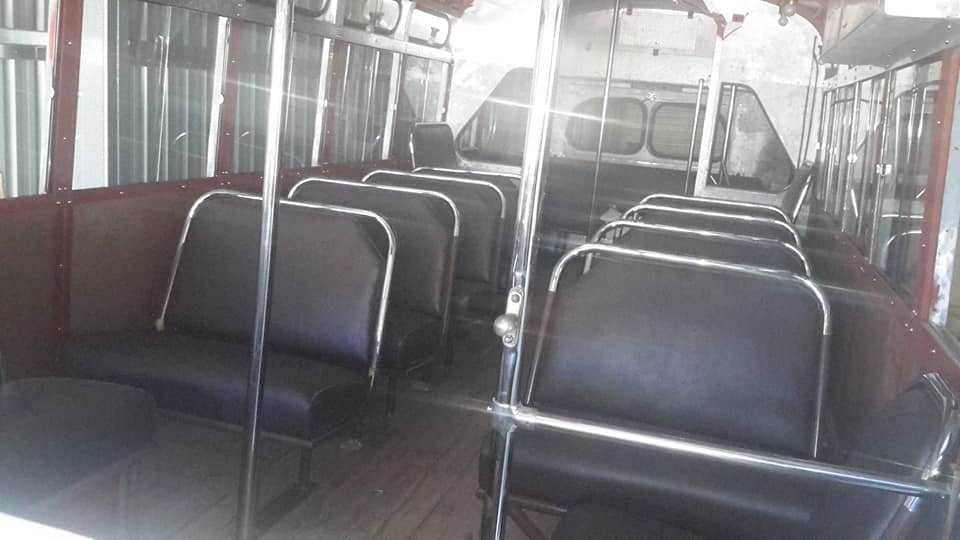
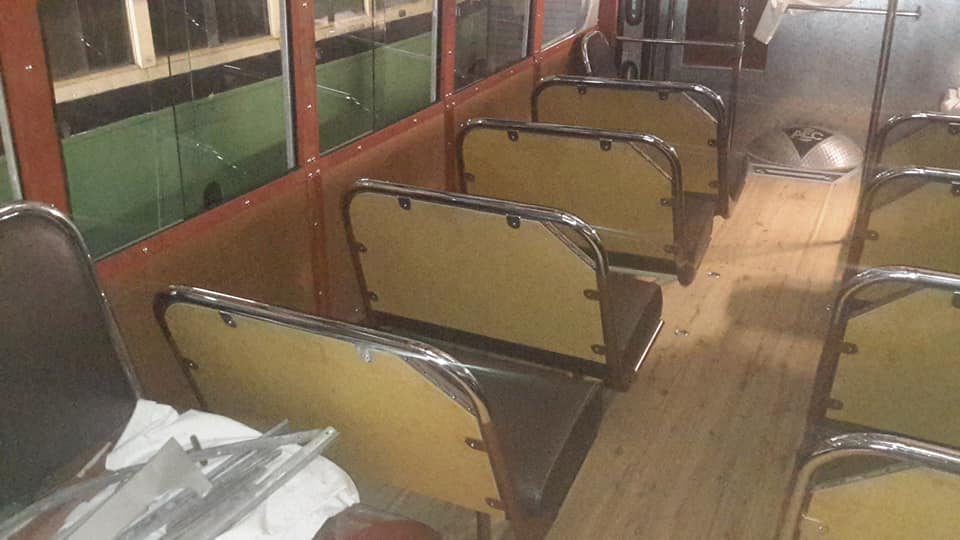
I apologize for the quality of the photos.
The problem with reflective light unfortunately!
I needed to clear some space and these seat frames and cushions take a lot of space.
Ordinarily cushions and frames can just be put in a corner and kind of crunched together, but these frames are rechromed and the cushions re upholsterd so separation was important to me.
Because the inside bottom section of the interior of the bus was done for now I put the seats back in position to make space.
There are 14 seats and 6 are still yet to be painted.
If you remember I got the top section of each seat chromed and then the idea was to powdercoat afterwards.
The first 8 turned out great but the next 2 came back with the chrome bubbling in sections.
I was able to get the problem ones rechromed at no cost to me but it meant taking them back to Coffs Harbour, a 1250km round trip.
Neadless to say I wasn't willing to take anymore risks.
In any case they will be sandblasted and primed then I will be painting them.

Stuart Brown
Norman’s show bus 😎
All looking rather awesome
Now that I can see the light at the end of the tunnel, I can safely say what has been done to this vehicle.
Approximately 35% of the frame has been replaced. No roof bows have been damaged by rust, though the roof had to be raised in one area.
100% of the glass has been replaced. 95% of all rubber will be replaced. All aluminium flat skin has been replaced.
Apart from the egg shell panels the roof will be replaced. The internal ceiling sheeting will be stripped of paint and reused.
The radiator shroud was replaced and rechromed. The whole chassis was stripped and repainted. The battery box was rebuilt.
All the air lines have been replaced. The mechanicals around the driver as in hand brake lever, gear changer foot pedals were all taken off and serviced.
All the wiring was replaced.
Most of the route number scrolls were replaced with calico type.
New flooring and new stair cases.
Everything except the engine, gearbox and diff was taken off and serviced and painted. Waterpump stripped and rebuilt.
There are things I can't think of.
John Clarke
WOW! I can't wait to see the finished product.
Norman Julian
Just adding to that the 2 jacknife doors where stripped down to their bare bones, inspected and painted and then rebuilt using new glass but I reused the rubber. It wasn't too bad.
Pablo E. Laredo
90% done 90% to go as they say. Champion effort in getting it done.
Gregor Neil Robertson
In the old days men left great cathedrals behind them. You leave buses.
Greg Gibson
Great work Norm I’m enjoying watching from the side lines. Please build a force 7 replica before you hang up your hat
Bryce Pender
May be an image of text that says "A PESSIMIST sees a dark tunnel An OPTIMIST sees light at the end of the tunnel A REALIST sees a freight train
The TRAIN OPERATOR sees 3 idiots standing on the tracks... -Unknown boardofwisdom ifunny.co"
Stuart Brown
Really enjoying watching this and look forward to seeing it live one day.
Beautiful inspiring work too.
Hugh Esler
Here here!!👍👍
Fred Holland
Been great watching your progress, cant wait to see the finished results.
True craftmanship at work.
Really enjoying watching this and look forward to seeing it live one day.
Beautiful inspiring work too.
Hugh Esler
Here here!!👍👍
Fred Holland
Been great watching your progress, cant wait to see the finished results.
True craftmanship at work.
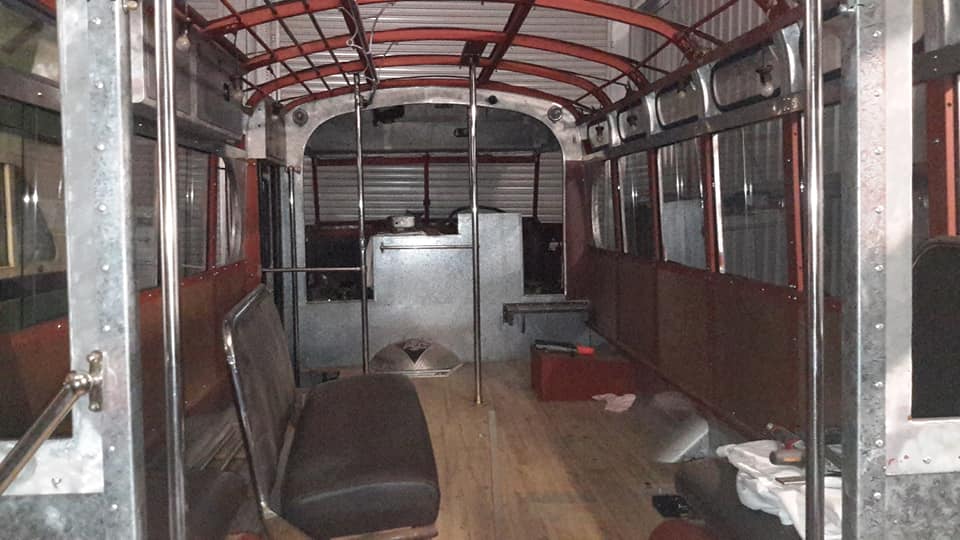
Norman Julian 1st May
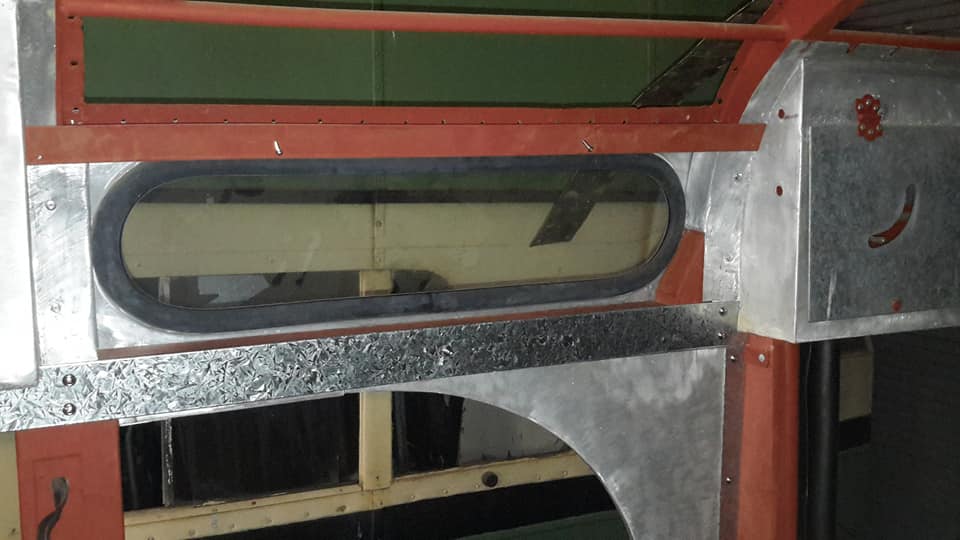
Today another little milestone was achieved.
The saloon sliders and internal wall trim is now finished.
I had to get 2 sliders shortened by a few milimetres each because they were a little tight.
The odd shaped windows on either side front still have to be made.
I didn't want to use the originals for patterns because both sides in this area were rusted out and had to be rebuilt.
I wanted to finish these areas off first and make new patterns to fit so as to make sure the glass fits exactly.
Pablo E. Laredo
That's a great effort there Norman,
Stuart Brown
Beautiful Work Norman
Still really intrigued as to how this all gets painted
Norman Julian
Stuart Brown wondering that myself!
Hugh Esler
Amazing job. You are so patient 🤓
That's a great effort there Norman,
Stuart Brown
Beautiful Work Norman
Still really intrigued as to how this all gets painted
Norman Julian
Stuart Brown wondering that myself!
Hugh Esler
Amazing job. You are so patient 🤓
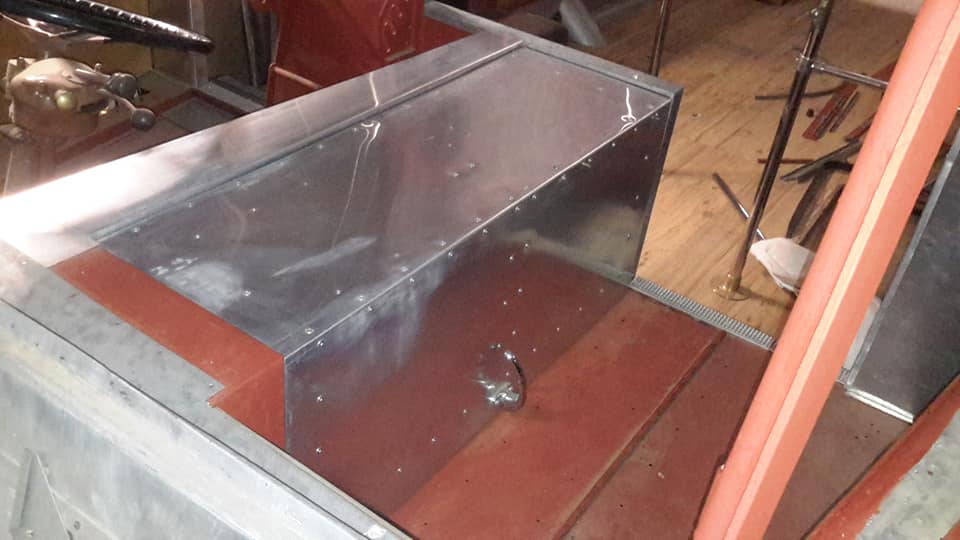
Norman Julian 5 May
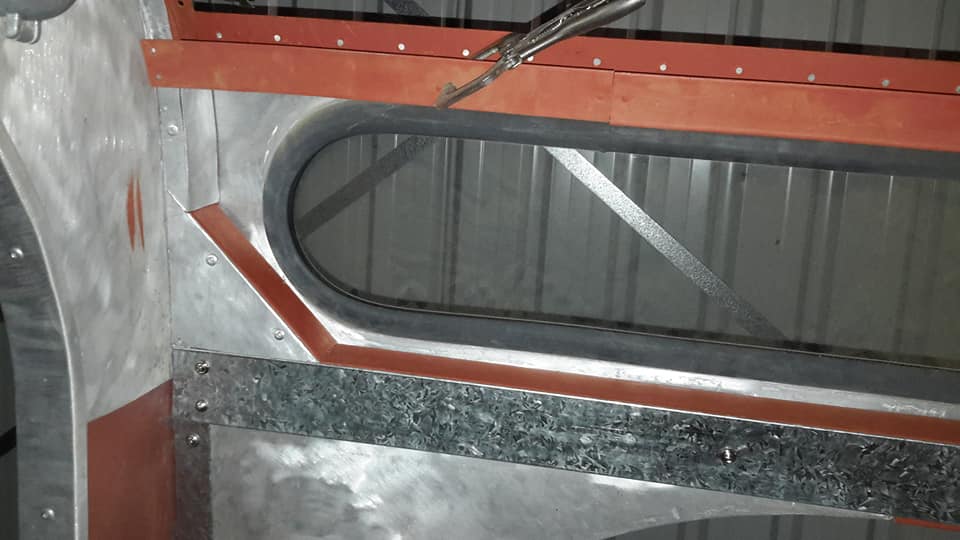
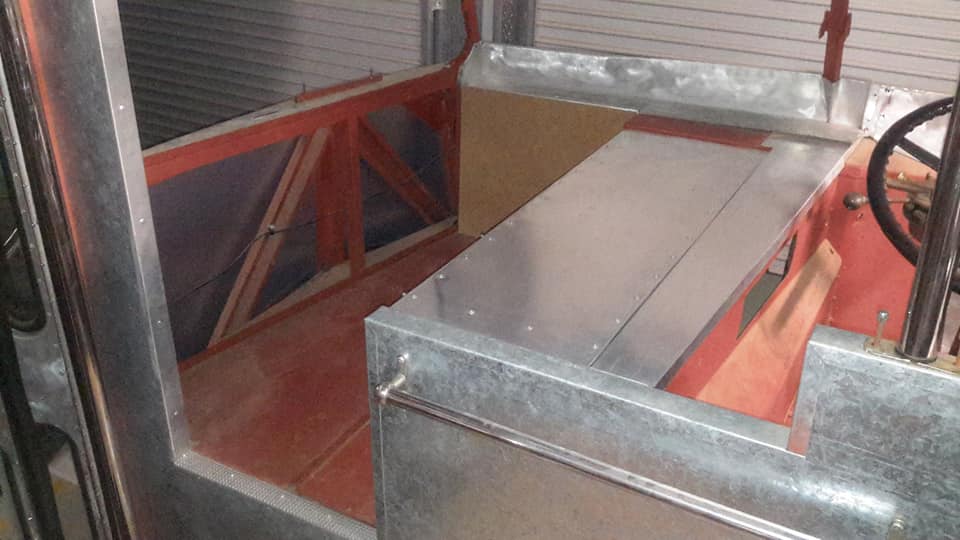
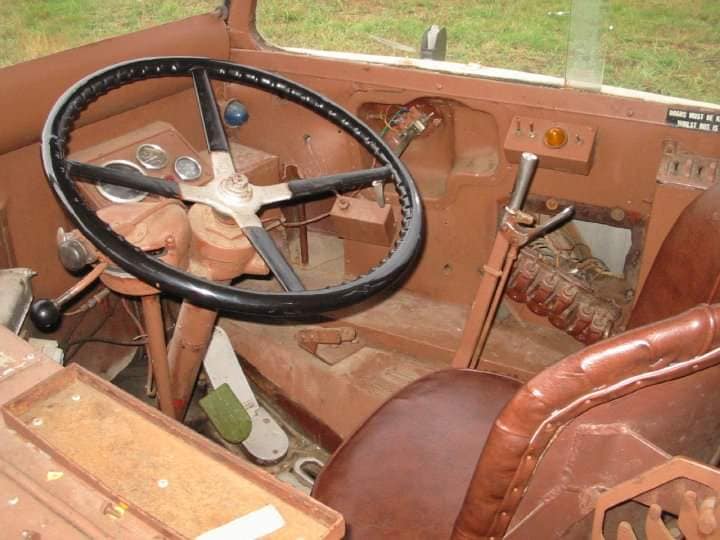
Yesterday I started on the front cabin area again.
This will be a challenging one because of the drivers compact compartment.
Barely enough room to turn around let alone getting in there to do work.
I had to get a few of the window panels patched up.
Also some panels had some bad corrosion which if wasn't so complicated to make I would have replaced them.
The cabins very front push out window panel on the nearside needs some serious attention.
Even before I originally pulled it out there were gaps in the middle where the window didn't close up properly.
The panel itself looking down on the long edge slopes quite noticeably.
The real challenge will be the control box/fuse box area.
The original masonite panel was in tatters with nothing much left, any wonder the series 2 replaced it with steel.
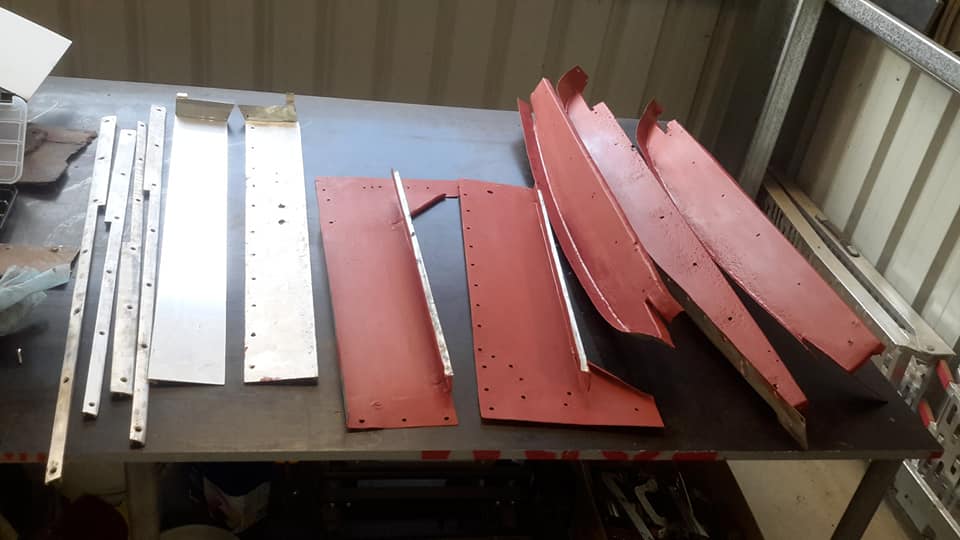
As with every other aluminium panel that came off they were painted with 2 coats of primer.
The window frames themselves were given 3 coats of primer.
Yesterday I started on the front cabin area again.
This will be a challenging one because of the drivers compact compartment.
Barely enough room to turn around let alone getting in there to do work.
I had to get a few of the window panels patched up.
Also some panels had some bad corrosion which if wasn't so complicated to make I would have replaced them.
The cabins very front push out window panel on the nearside needs some serious attention.
Even before I originally pulled it out there were gaps in the middle where the window didn't close up properly.
The panel itself looking down on the long edge slopes quite noticeably.
The real challenge will be the control box/fuse box area.
The original masonite panel was in tatters with nothing much left, any wonder the series 2 replaced it with steel.
As with every other aluminium panel that came off they were painted with 2 coats of primer.
The window frames themselves were given 3 coats of primer.
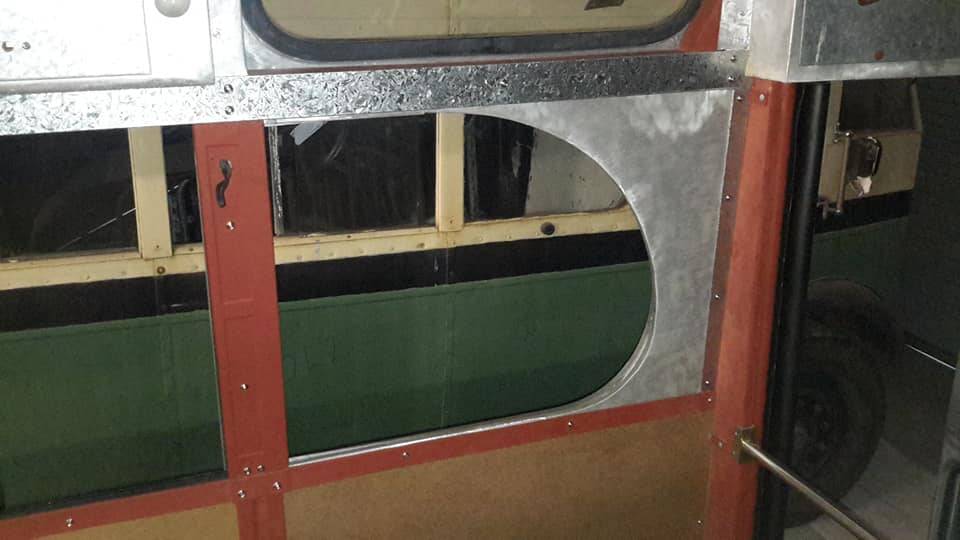
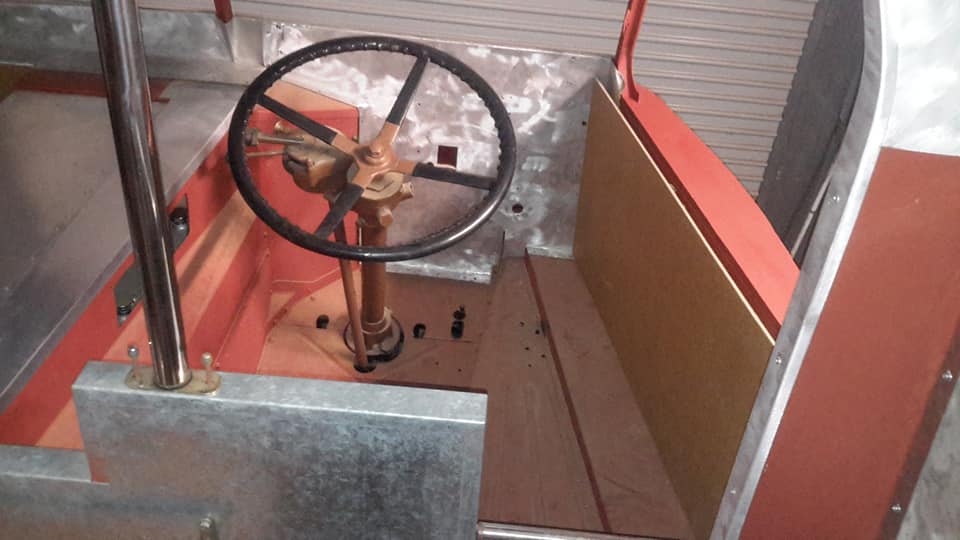
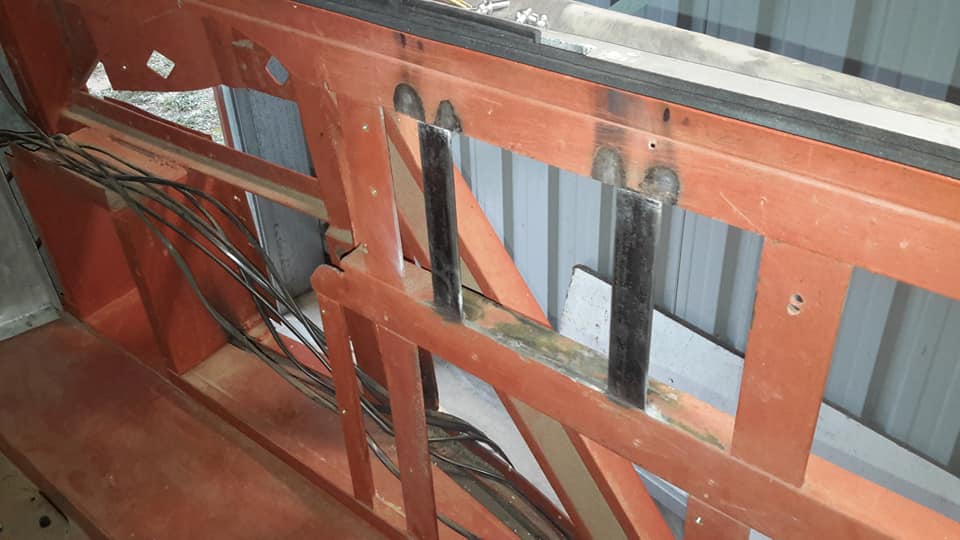
Norman Julian 10th May
I spent more time than I would have liked on this area.
The wall card made of masonite was so warped in this area that it had broken up into small pieces and over time they have mainly dissappeared so it took time to get the positions of these parts right.
The hand signal panel has to be in the right position.
No if , buts or maybes.
This fuse box is a little bigger than the original because I added another fuse and switch.
Unintentionally I might add.
I was concentrating so much on getting it just like it was originally that now that I look at it I hate the layout.
The door switch box is too close to the hand mechanism.
It should be more centeal to the control box.
That's just the way it worked out in the factory because of body brackets behind the board that it mounts to which is out of picture.
It will irritate me now till I change it.
I did some changes to the way the control box sits.
It normally requires nuts and bolts to mount it to the floor.
The top of the control box has mounting points on either side so as to mount it to the wall.
It also has inside the unit mounting points on the floor.
When you take the bolts off the top part you can tilt it forward to get to the back of it.
Originally the bottom plate which is hinged by the way was just bolted to the floor using nuts and bolts.
I welded a plate instead under where it mounts and tapped 2 threads so as to bolt on from the top and not have to worry about loose nuts under the wheel arch to hold to get bolts off from the top.
Ben Summers
Looking good there, Norman!
Not much has taken place on mine lately as there have been more pressing matters to deal with, though work has picked in the last two weeks.
Looking good there, Norman!
Not much has taken place on mine lately as there have been more pressing matters to deal with, though work has picked in the last two weeks.
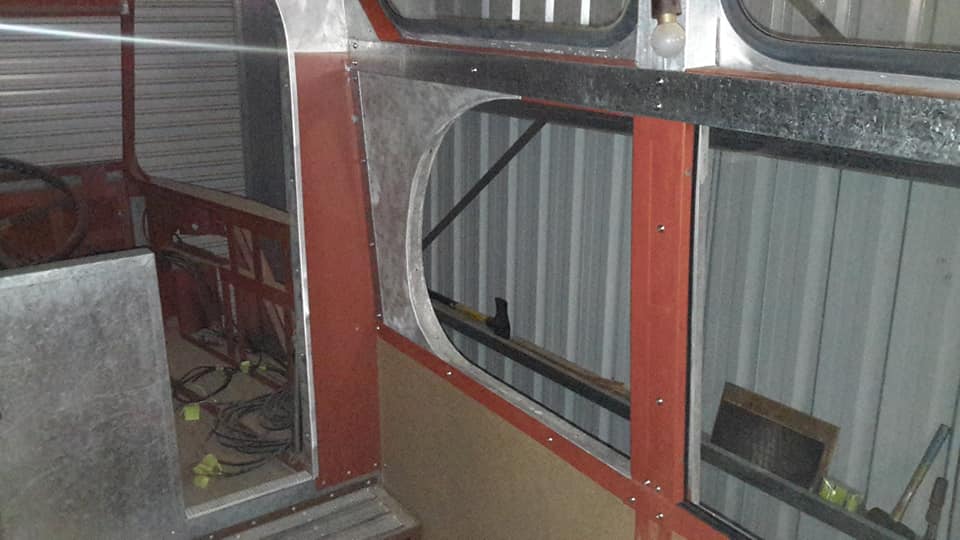
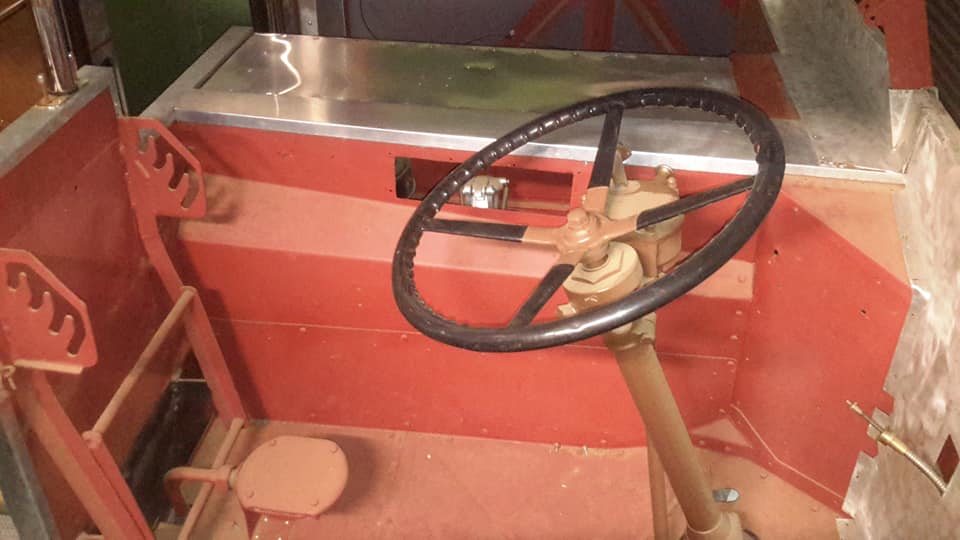
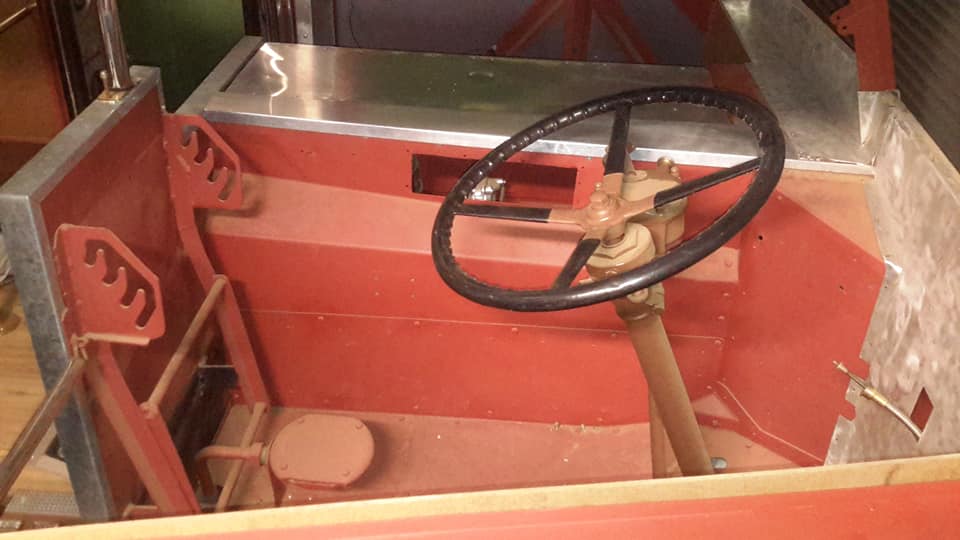
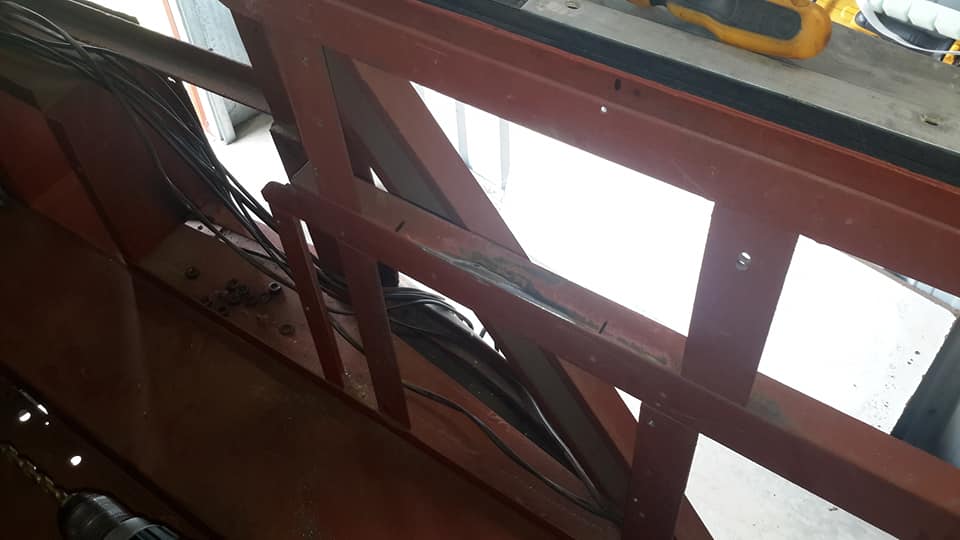
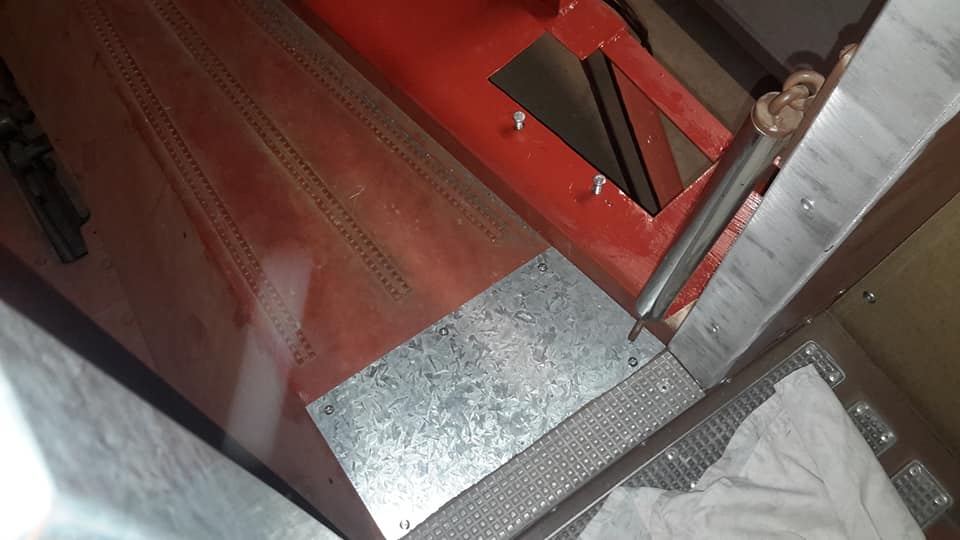
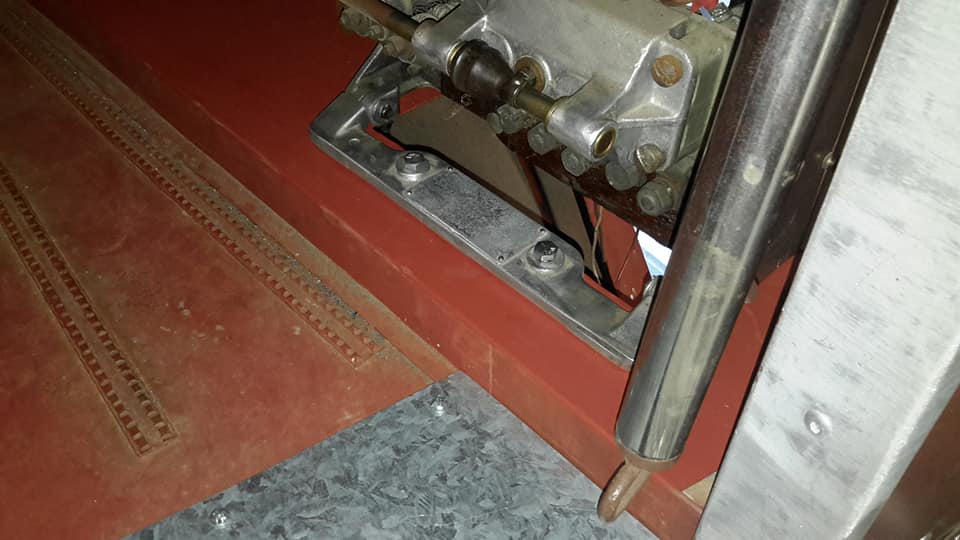
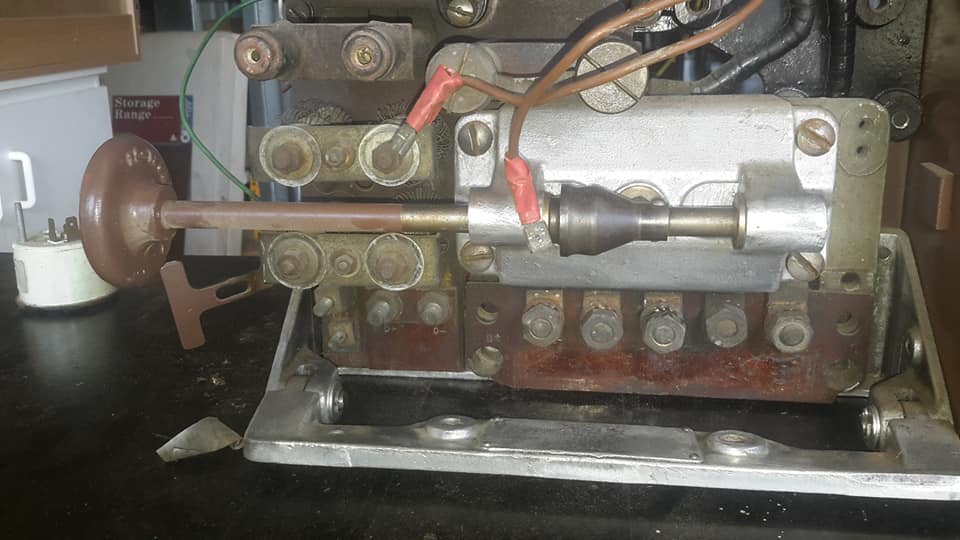
Norman Julian 11th May
Well today I took off all I did yesterday and modified the drivers side cabin wall so I could move the door control box.
I told you all that it would annoy me the way it was.
The 2 vertical plates will be drilled and tapped for the door box to hold on to rather than just being held by the masonite.
Here is the photos of the control box mods as well.
Now there are no nuts to put under the floor to hold the box in position.
Just screw down a bolt.
The other thing is the replacement cover plate for where the control box was originally.
Because this bus came from England this bus came over with running gear on chassis only so the control box would have been behind and adjacent to the driver on top of the hole as pictured because most buses in England would have been half cabs so entry would have been like a decker?
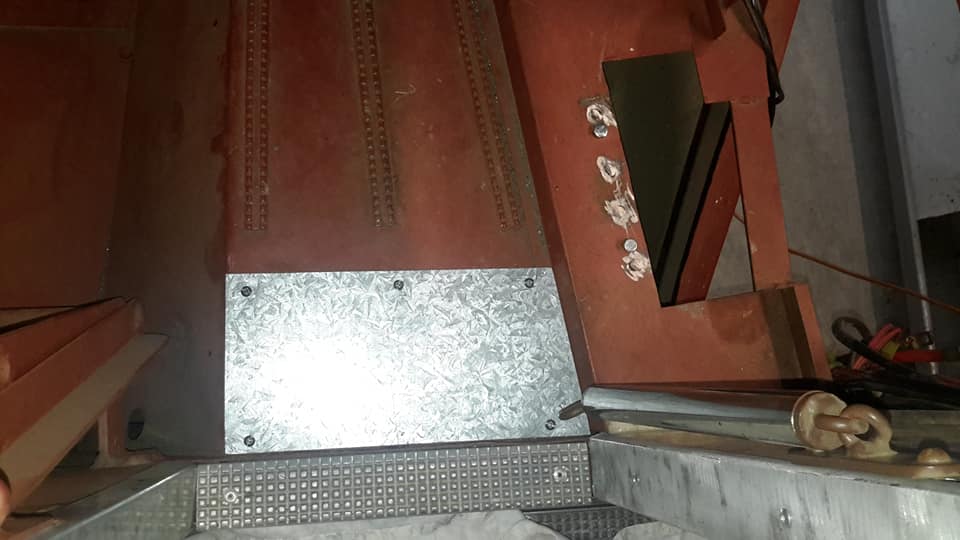
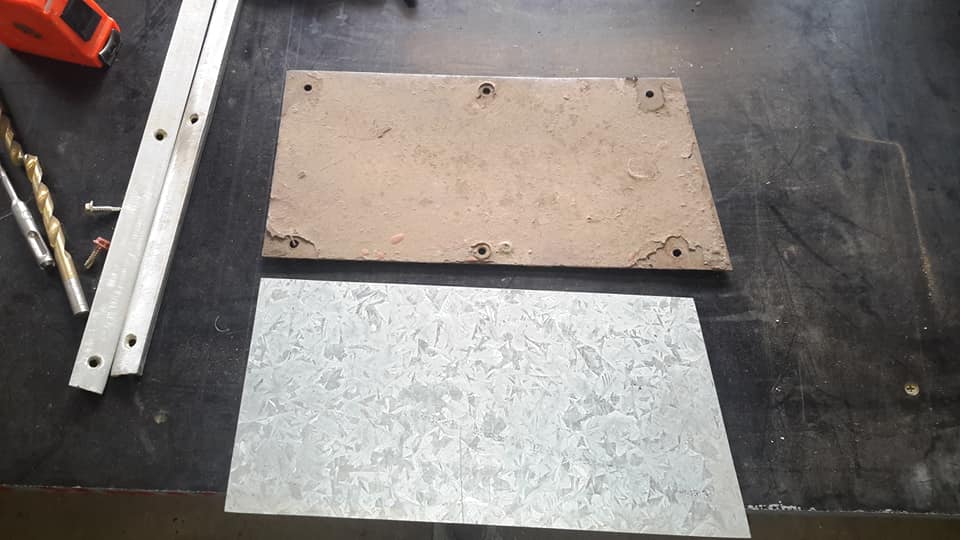
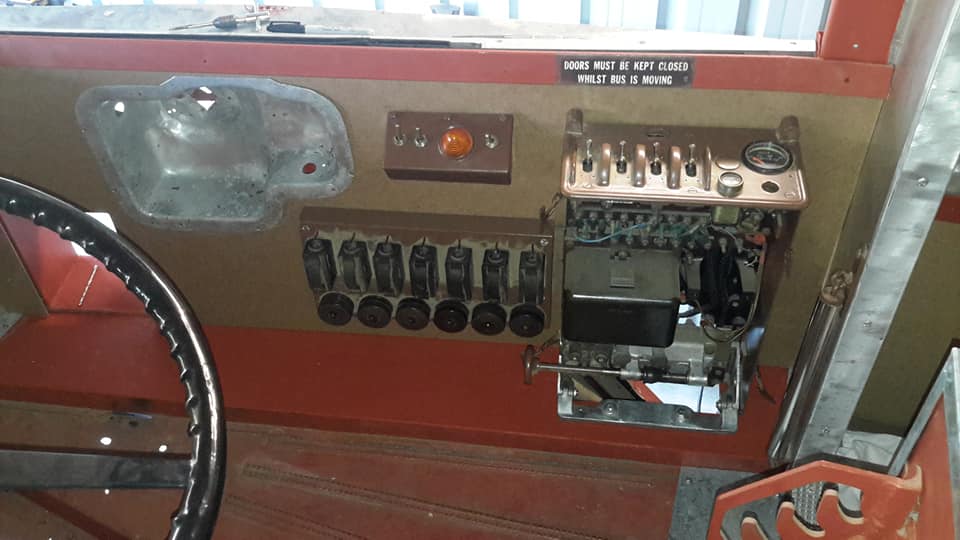
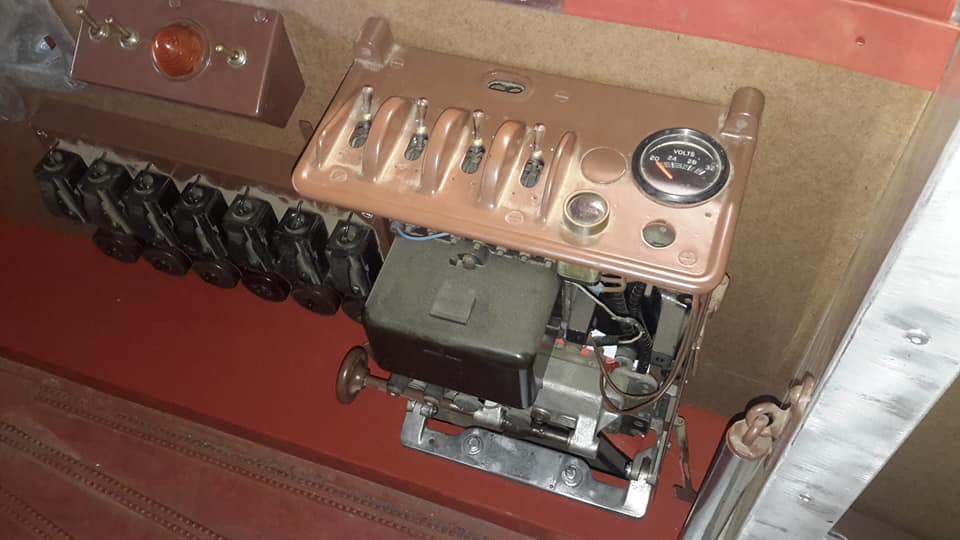
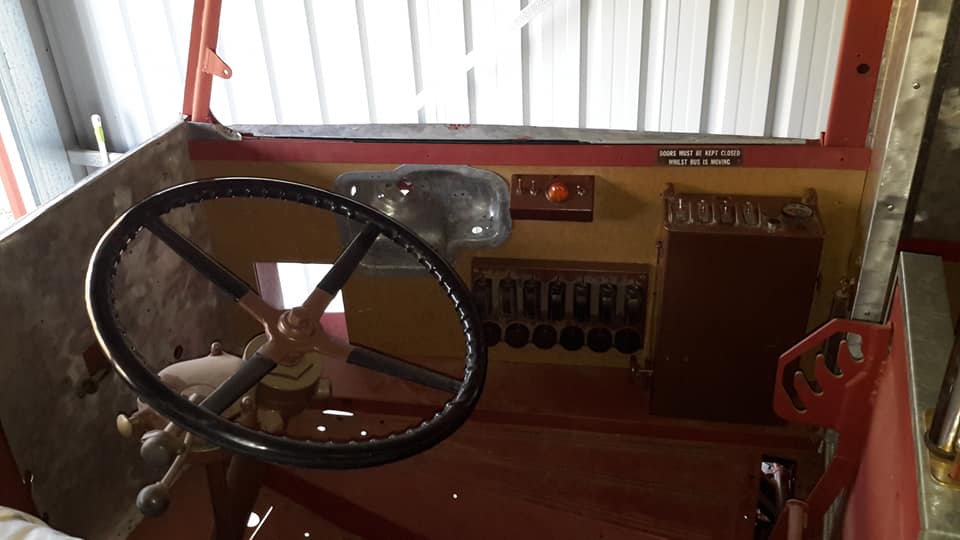
Norman Julian 12 May
I'm happy with the new position of the door switch.
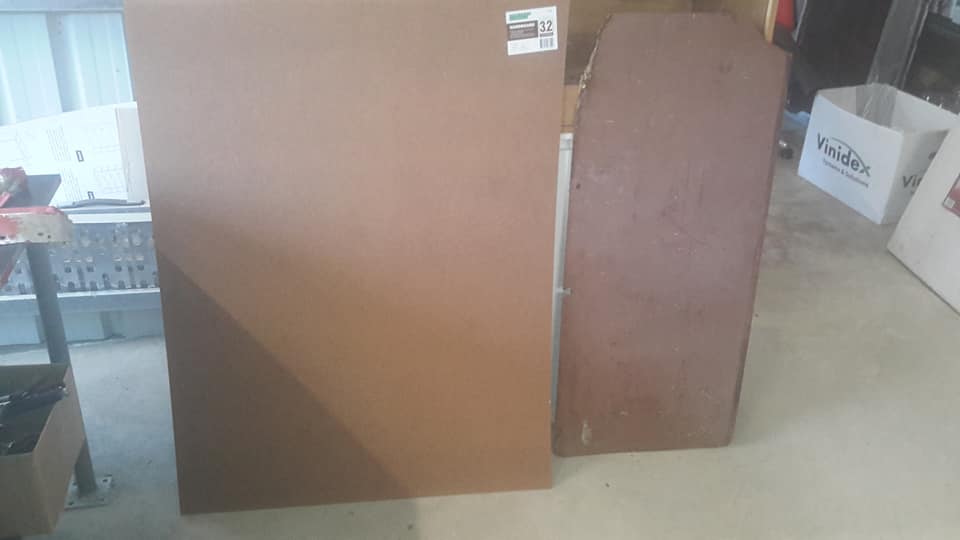
I had to make a new wall card but that's OK.
Because it was an odd size I had to buy a 2400 x 1200 sheet.
I have added photos with the control box without the cover to show how it bolts down now.
If at any stage you had to change the box, side panels would have to be taken off to get at the nuts underneath.
I'm happy with the new position of the door switch.
I had to make a new wall card but that's OK.
Because it was an odd size I had to buy a 2400 x 1200 sheet.
I have added photos with the control box without the cover to show how it bolts down now.
If at any stage you had to change the box, side panels would have to be taken off to get at the nuts underneath.
Julian Mathieson
That's looking very very nice.
Norman Julian
Photos show up all the dust
Graham Inskip
The work you are doing is unbelievable...brilliant Norman.
Brian Musgrove
Unreal , better than new!
Maxwell Mcroberts
How do you work out all that wiring with out going Derrrr? your not the average bare genesis!
That's looking very very nice.
Norman Julian
Photos show up all the dust
Graham Inskip
The work you are doing is unbelievable...brilliant Norman.
Brian Musgrove
Unreal , better than new!
Maxwell Mcroberts
How do you work out all that wiring with out going Derrrr? your not the average bare genesis!
Norman Julian 12 May
I'm happy with the new position of the door switch.
I had to make a new wall card but that's OK.
Because it was an odd size I had to buy a 2400 x 1200 sheet.
I have added photos with the control box without the cover to show how it bolts down now.
If at any stage you had to change the box, side panels would have to be taken off to get at the nuts underneath.
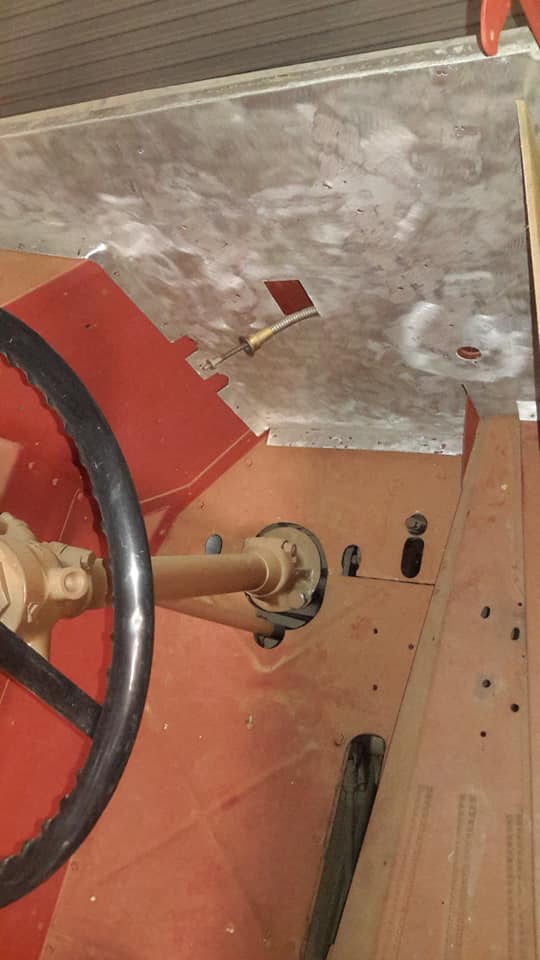
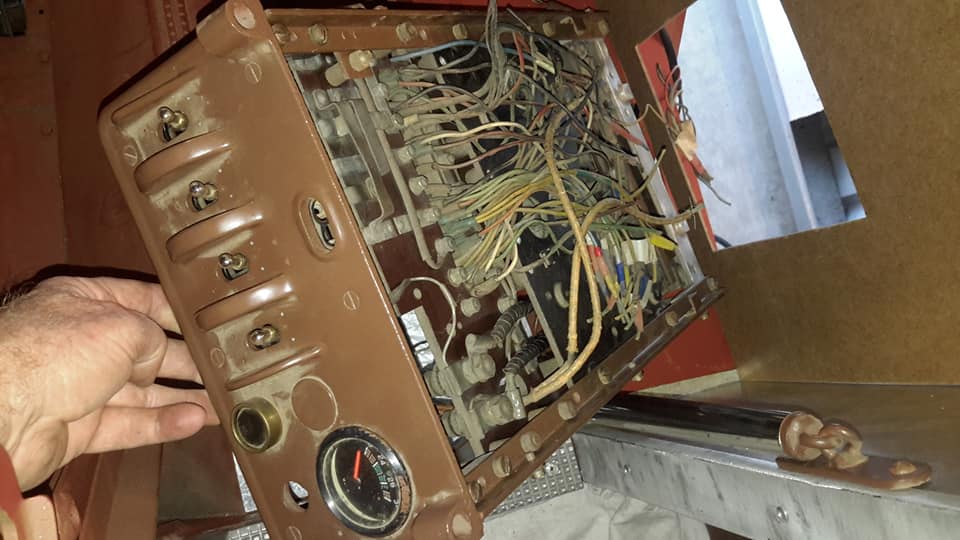
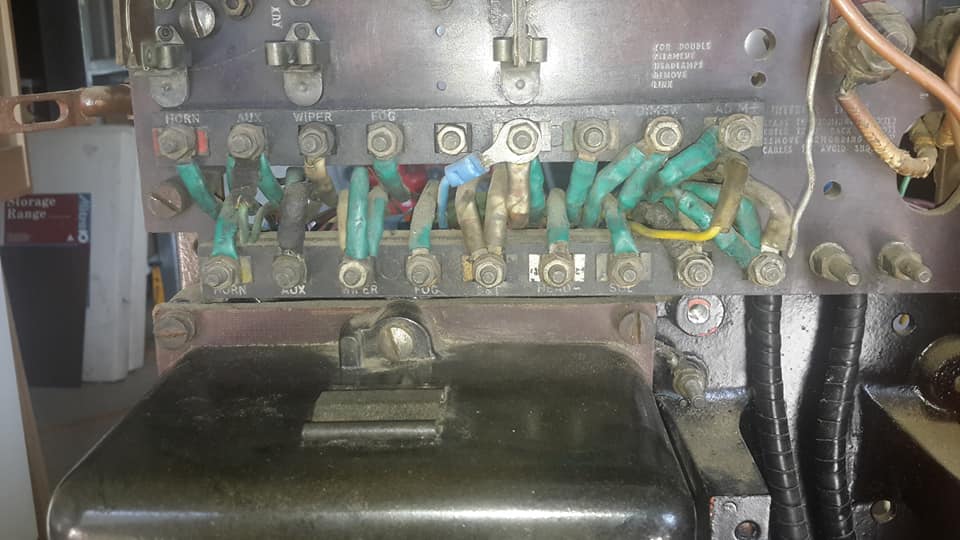
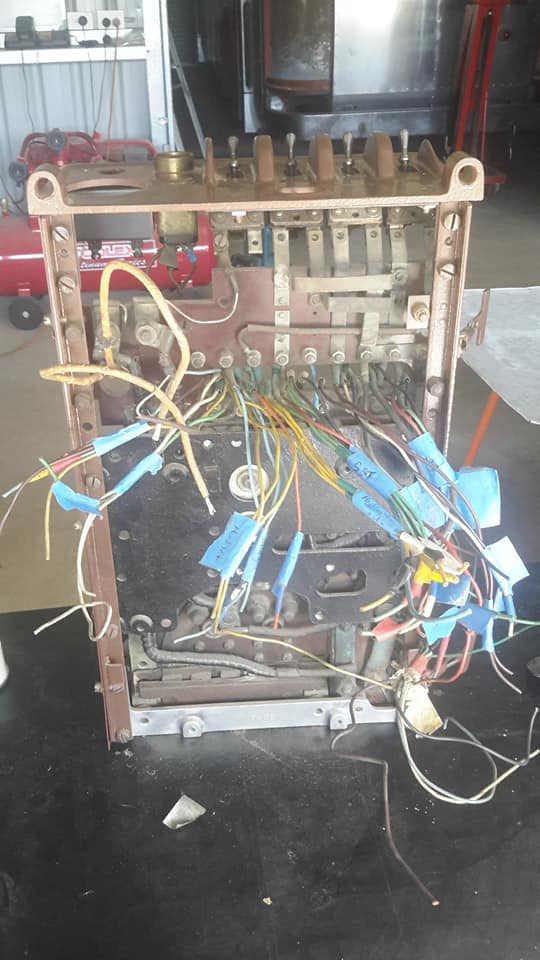
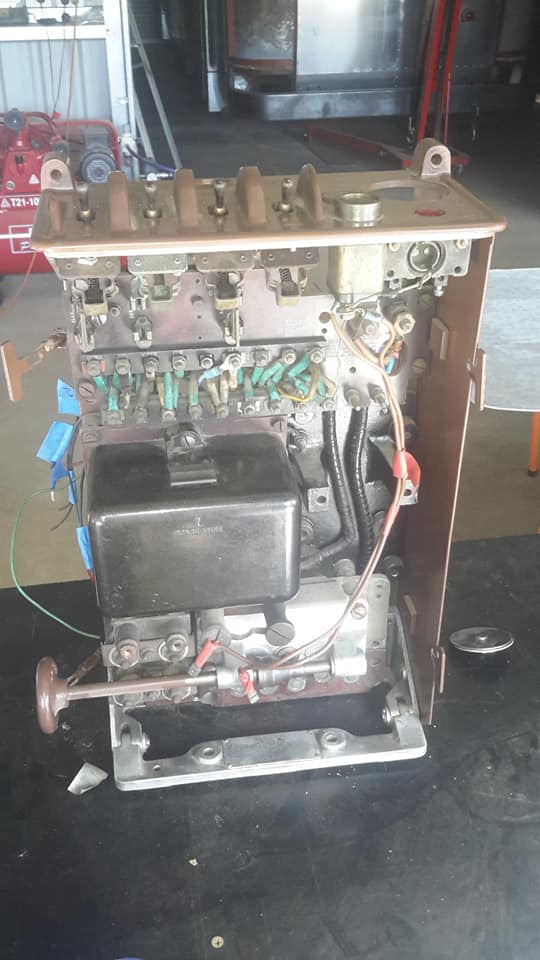
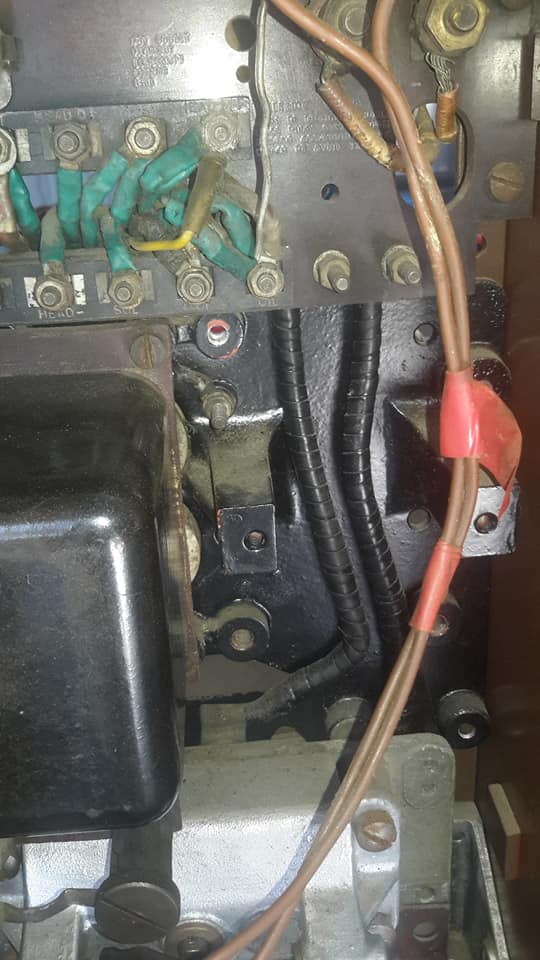
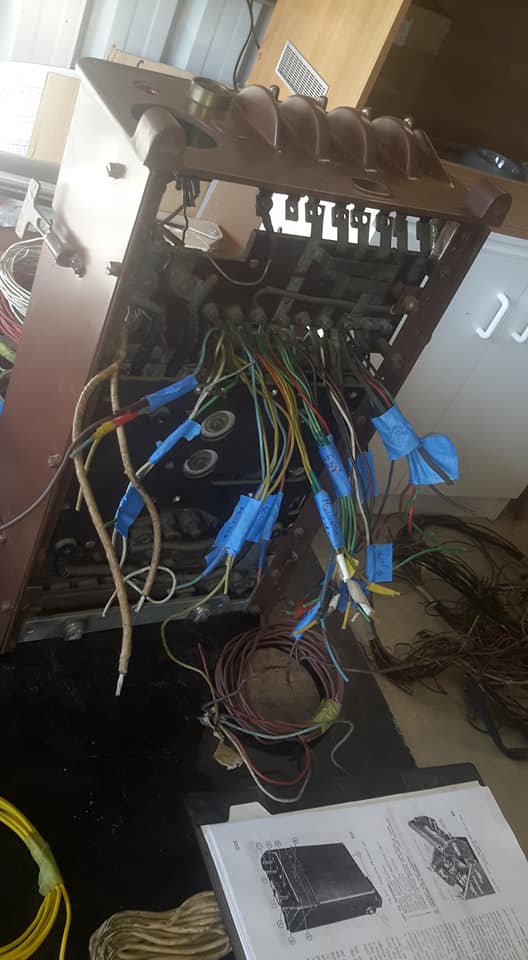
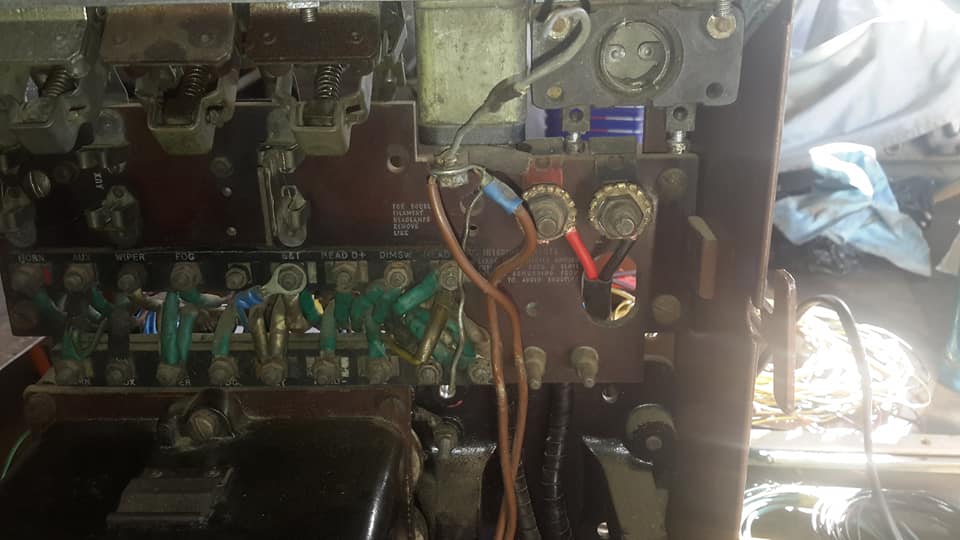
Norman Julian 16 May
May For something different I'm trying to understand the workings of this control box and its related fuse box etc.
etc.
This is as far as electrical work is concerned as easy as it gets for what it does.
In saying that it still loses me a little.
In the area where the wires are joined it is clearly marked what goes where.
I have taken carefully each section of wire off and examined both the wire and the terminal.
There are 3 wires that need to be replaced the rest are good.
I don't see the advantage in replacing all these wires when they are still in relatively good condition.
Lots of extra work in soldering new connections.
What I will do though is lengthen each wire so as to put the box in position and not have to move it again.
All the wires are marked so later on I can join on the new wiring thats already in position.
2 new wires I have already done.
Some of the other photos shows the insulation has worn away from the original wiring.
Some of this wire and some burnt wire was inside conduit.
Graham Inskip
Shrink wrap works wonders.
Garry Macoid
Nice work Norm, lucky its all coloured, my Reliance has complete original loom made using beige wire for every circuit.😭😭😭
Ben Summers
After looking at these images Norman, I'm going to leave the wiring on 2775 to a professional!
Graham Inskip
Ben well at least some pictures would be a help to see how far you have got...have you got rid of that bullbar yet?
Ben Summers
Not yet Graham; I have no experience using an angle grinder.
Hugh Esler
Doing well there Norm. After this wiring resto you can start on Star Ship Enterprise 🧐🤓🤓
Norman Julian 21st May
I apologize for the quality of the photos.
The problem with reflective light unfortunately!
I needed to clear some space and these seat frames and cushions take a lot of space.
Ordinarily cushions and frames can just be put in a corner and kind of crunched together, but these frames are rechromed and the cushions re upholsterd so separation was important to me.
Because the inside bottom section of the interior of the bus was done for now I put the seats back in position to make space.
There are 14 seats and 6 are still yet to be painted.
If you remember I got the top section of each seat chromed and then the idea was to powdercoat afterwards.
The first 8 turned out great but the next 2 came back with the chrome bubbling in sections.
I was able to get the problem ones rechromed at no cost to me but it meant taking them back to Coffs Harbour, a 1250km round trip.
Neadless to say I wasn't willing to take anymore risks.
In any case they will be sandblasted and primed then I will be painting them.
Stuart Brown
Norman’s show bus 😎
All looking rather awesome
This site is hosted on
Crazy Domains & Hosting  Unlimited Web Hosting |
Last updated May, 2021 |
This web site may contain Copyright material If you find any problems with the site, please email the Web Editor  |