Norms Restoration - 31 Seater Projects & Leyland DT 5 Project |
1939 Leyland TD5 [1635 DD]
2020
Mechanical March
- Norman Julian 9 Mar
- After a week I'm back into it.
- The last job I wanted to do on this engine was to take the back box section of the sump off but it isn't the way it was designed.
- It is bolted to the main sump from the inside, so I have to take the whole sump off.
- Unfortunately the sump is bolted to the bottom part of the block.
- When you start to undo the nut then everything starts to turn.
- That's OK because you can get a spanner top and bottom till you get to where the starter motor is.
- There are 3 bolt heads I can't get to so I had to take the starter off.
- I wont do anything else to the starter but clean it up.
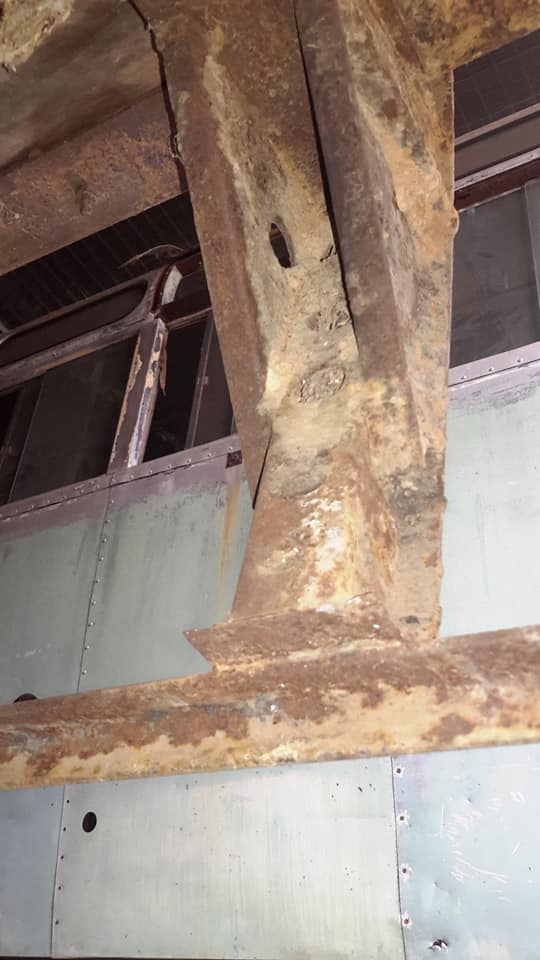
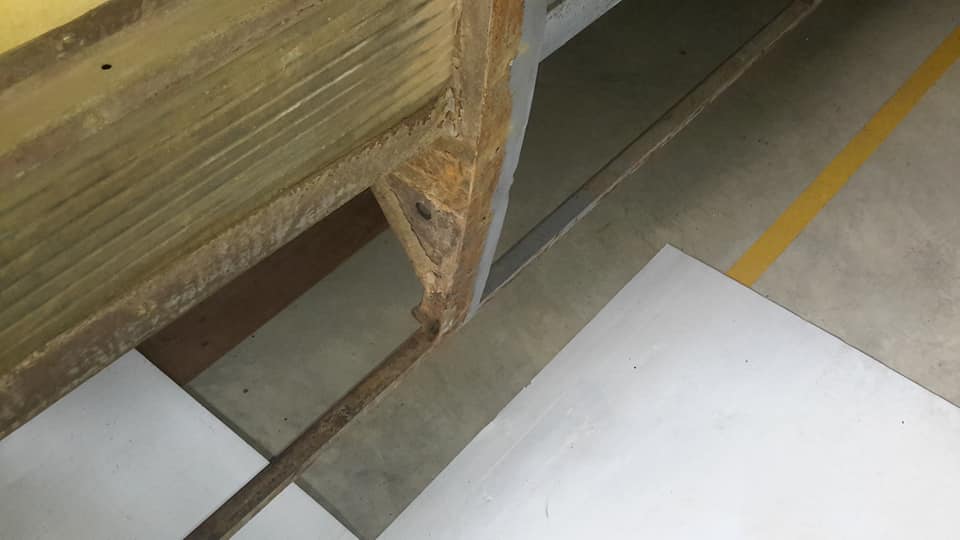
- The other thing I wanted to show you was the lower part of the wall pillars.
- For some reason they capped them up and not open.
- The later model buses had theirs open at the bottom.
- You can see that these are full of dirt right up past where the gusset starts.


- Andrew Blacklock
- Good idea to leave those starters alone if itís working ok
- Norman Julian
- Andrew Blacklock yeah.
- It sounded really good when it started so I wont touch it!
- Gregor Neil Robertson
- Thanks for these.
- We were all wondering why the business had been so quiet!
- I canít quite work out how the starter motor is secured on the block.
- Interesting seeing the bottom end of wall pillars.
- Dirty but little corrosion evident.
- Might be at least worth taking a look at the brushes on starter motor if their cover comes off easily.
- Getting at the sump bolts - not much ground clearance for you I imagine.
- Re-installing wonít be easy.
- I see a platform with 4 studs -?
- Is it the fixing point for the filter or what?
- Norman Julian
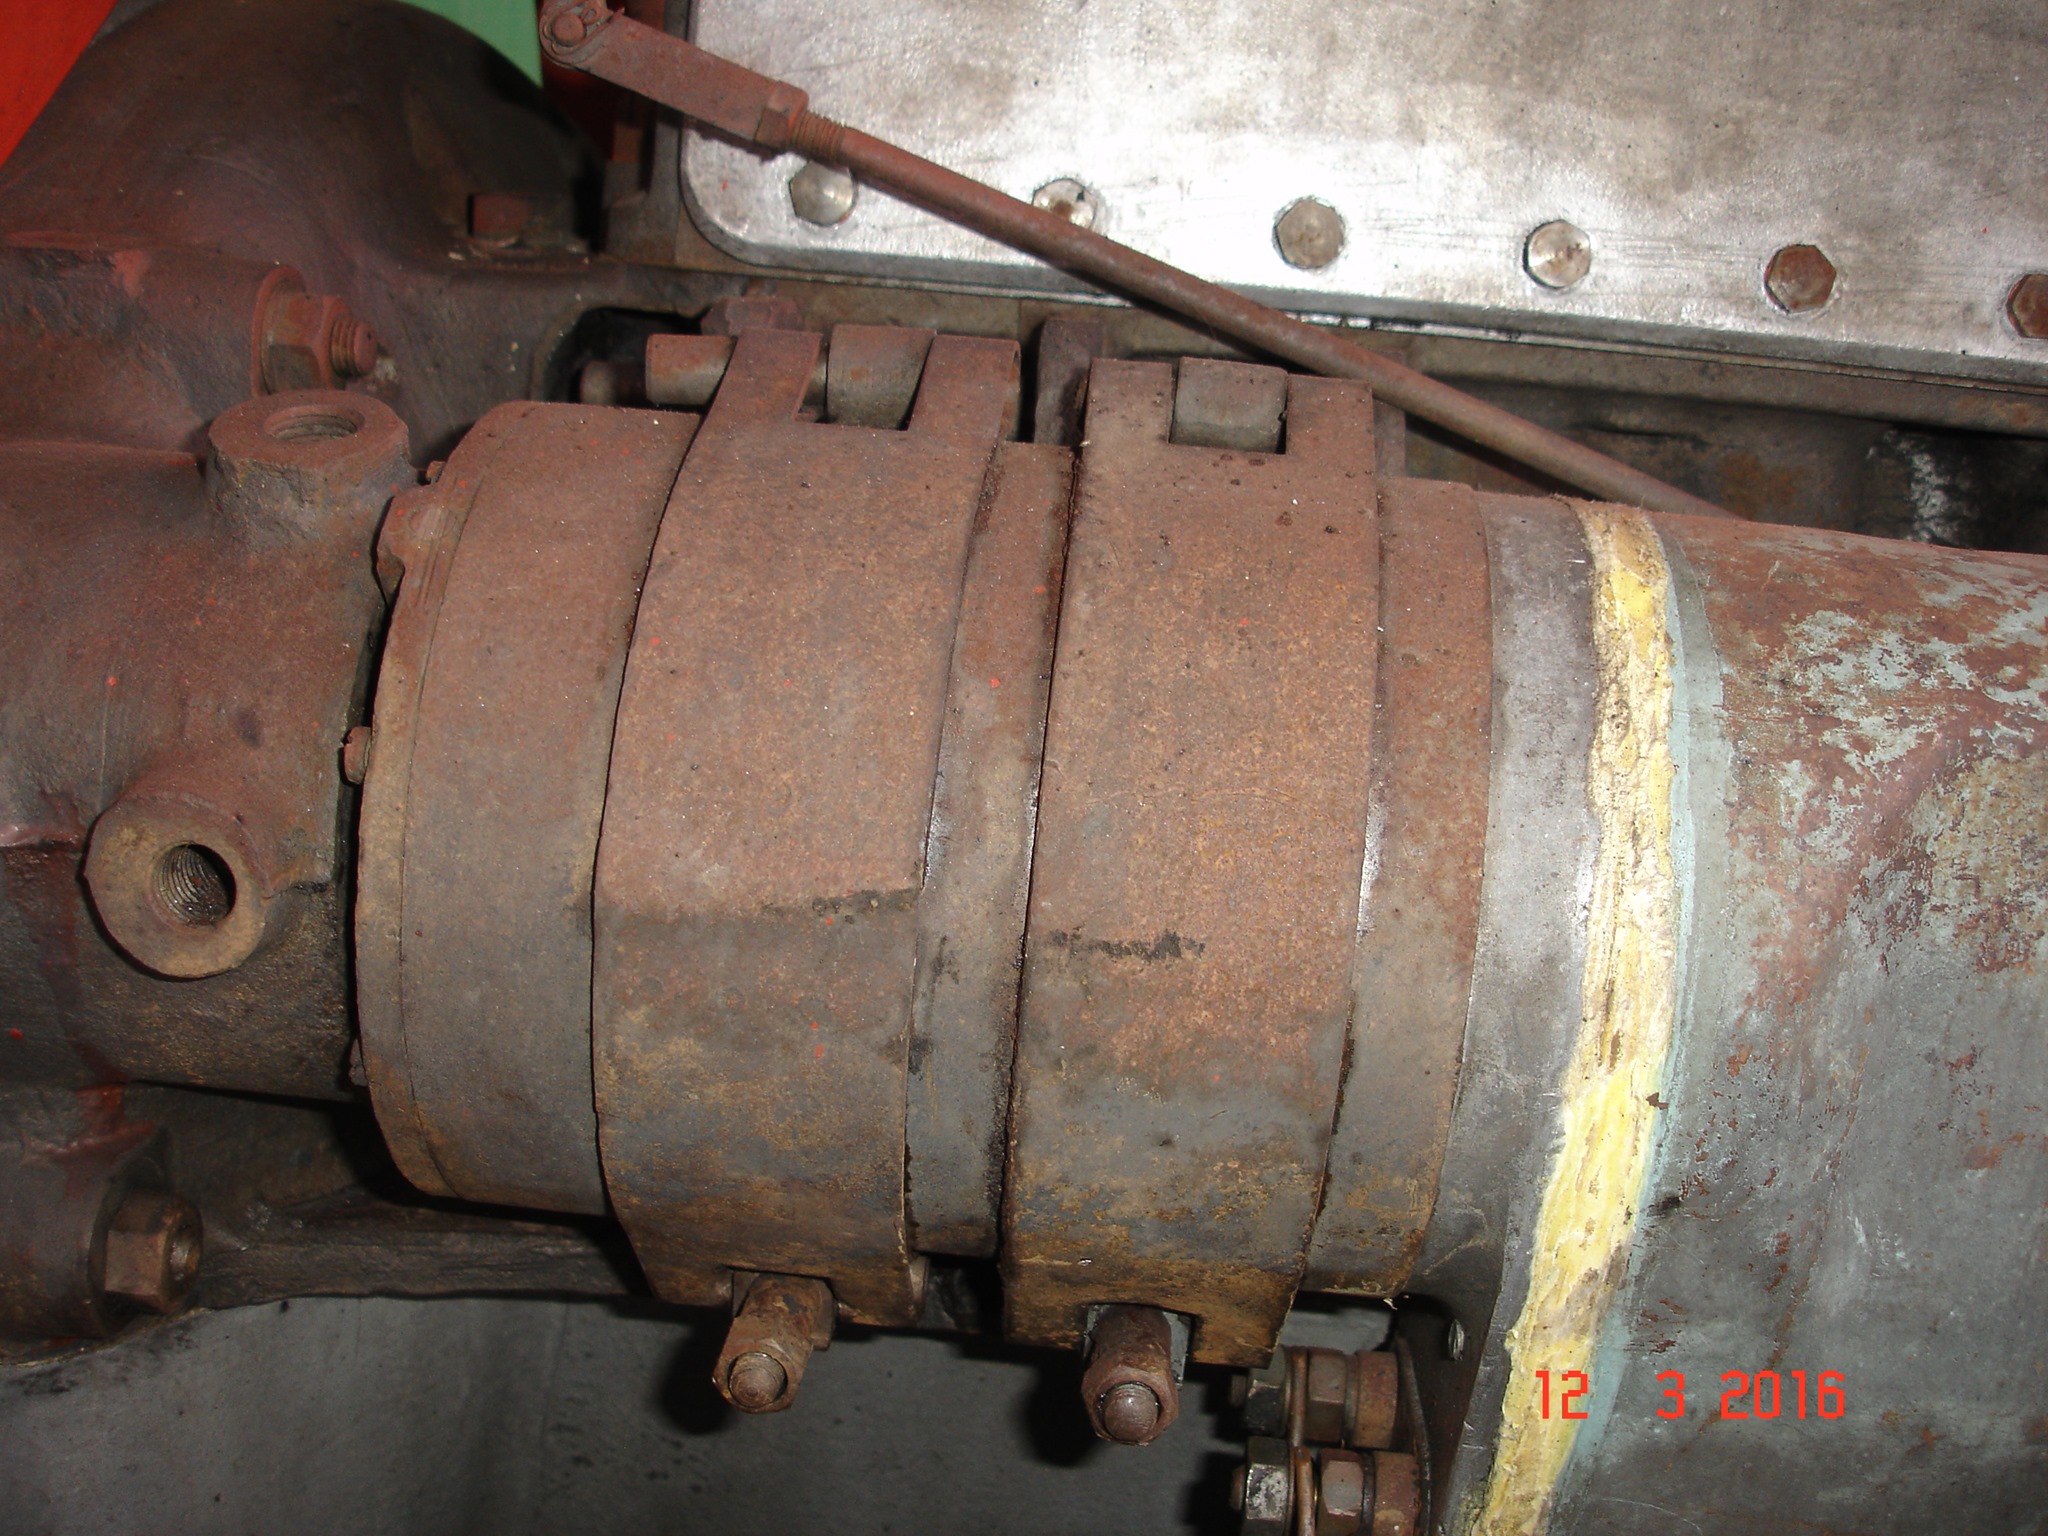
- There are 2 straps that wrap around the starter.
- One end of the strap is bolted to the bottom part of the block and the top part is bolted to the the block in a different position.
- When the starter is placed in position then the 2 halves of the strap come together and a long screw goes through one part of the strap and bolts onto the other half of the strap.
- Gregor Neil Robertson
- Norman Julian unusual arrangement.
- Normally body bolted to block as you know!
- These straps must be very strong.
- Norman Julian
- Here is the same sort of arrangement off another type of bus

- Norman Julian
- Gregor Neil Robertson this is a starter motor in position and strapped down.
- Andrew Blacklock
- Gregor Neil Robertson typical pommy starter fit up for that era of bus
- Gregor Neil Robertson
- Andrew Blacklock thanks.
- Iíve never had the opportunity/ privilege of bus servicing.
- Only vehicles -cars and commercials - going back to the 30ís.

- Norman Julian 10 Mar
- I'm glad I took this off in the end.
- Plenty of sludge but not as much as I would have thought.
- The biggest sump I have dealt with.
- 1200mm long.
- Messy job ahead cleaning it.


- Charles Shipway
- I think if the motor could talk it would give you a Big Thank you Norman for the attention to detail cleaning of the sump
- Norman Julian
- Charles Shipway thanks buddy
- Gregor Neil Robertson
- What a beautiful machine.
- Thorough, solid, fully resourced engineering.
- Robert Stevenson
- Baby compared to the V16 Cats I used to play with
- Norman Julian
- I'm glad it isn't any bigger thank you.
- LOL
- Stephen Rooke
- What oil do you run Norman in these buses as the manual says use an oil with a sulphur content.
- Iíve put Penrite SAE 20-60 but not sure if itís the correct oil.
- The sludge in the pan may account for my oil turning black as soon as l started my bus.
- Norman Julian
- Not even sure whether sulphur is in any modern oils.
- This problem only occurs when the oil is sitting for a very long period of time.
- Apparently when they did oil changes back then they just filtered it and reused it again.
- Most bazaar.
- Oil can burn and then the properties can break down which causes wear.
- Diesel engines can break down oil much quicker than petrol engines.
- Norman Julian
- The oil I have in my AEC book written in there by the guys from the museum is Castrol SAE 40
- Stephen Rooke
- Thank you, l may need to talk to the museum.
- Not much help here in Victoria.
- Norman Julian 11 Mar
- I spent 3 hrs on this today.
- The pressure sprayer took off about 50% .
- There was 80 years of accumulated crud on the underside and around the sides that had to be removed with a scraper and wire brush.
- Some instances I had to get the hammer out with the scraper.
- The inside I soaked in degreaser after I scraped the crud infested oil.
- Tomorrow I will take off the oil pan at the back and the strainer.
- I think around the back and under that strainer is filfy with crud.


- Dennis Boros
- That has certainly come up very well!
- Norman Julian 12 Mar
- Well there was lots of crud around and under the strainer.
- In the end the sump was easy to get off it was just that while your underneath with limited light and mountains of road crud and oil mixed with it and never having to take one off before it was easier to take the whole box and dice off.
- I think when I put this back together and start her up for the first time I will know that she is at least clean inside the engine .
- Another good thing was that if you remember me saying I lost a nut down in the workings when I took the head off, well I found it in the front part of the pan.


- Stuart Brown
- Nice work
- Just done the same job on a rover V8.
- Good feeling starting with lovely clean bits and knowledge it is done properly
- Norman Julian 12 Mar
- Second clean.
- The pan is clean.
- Rough casting.
- Some of those holes go very deep.
- This is the gasket.
- Came off fairly easy.
- Why am I worrying about making any.
- Lastly I cleaned the strainer with a brush and still clammy.
- I will soak it in degreaser.


- Norman Julian
- After getting a valid opinion this is not rough casting on the bottom of this sump but rather corrosion caused by water sitting on the bottom of the sump.
- I had to look it up because I thought the opposite.
- So if anyone buys a bus that has been sitting forever, do what I'm doing and drop the sump.
- Carle Gregory
- nasty
- Norman Julian
- Just explaining what I mean is that oil sitting in a sump for sometime then moisture gets in the water sinks to the bottom and starts doing its work . . . corrosion!
- I just didn't understand because you need oxygen to create corrosion but I guess water and oxygen go hand in hand.
- Gregor Neil Robertson
- Are you planning to deal with the imperfections with some of that repair compound - which would be compatible with the cast aluminium?
- Carle Gregory
- looking at the holes i would say Defcon
- Norman Julian
- Defcon 5 or 1. hehehehehe
- Norman Julian 12 Mar
- Does anyone know of anything that can be applied to a cast alloy sump to seal it that will be submerged in oil.
- I don't know of anything.
- Cameron McFadyen
- Check out KBS Coatings web site
- Andrew Blacklock
- Belzona products?
- Andrew Blacklock
- Devcon ?
- Robert Stevenson
- @nd for the KBS products.
- If they can seal fuel tanks, I dont think oil will be a problem.
- Ive been using their rust guard stuff for years.
- If ther other products do as well as that stuff I would be more than happy to use it.
- Paul Morton
- POR15 products sell a fuel tank sealer that would probably work.
- You have to be fastidious when applying their products or they will peel.
- Fastidious......... what an irrelevant word to use around you Norman Julian
- Norman Julian 13 Mar
- I took the oil sump in this morning to get cleaned and bead blasted and I asked the question about the corrosion in the bottom.
- He suggested even though some are deep he wouldn't worry too much about it.
- He then told me what may have happened with this.
- The old oils they used to use had sulphur in them.
- That in itself isn't an issue but when the engine is sitting idle for such a long time moisture gets in and settles to the bottom and mixes with the sulphur and creates sulphuric acid. We all know what that does. Modern oils don't have sulphur in it so the aluminium sump is protected.
- Circulation is important to the protection of engines.
- Not a day goes by I don't get educated with something I didn't know!

- Gregor Neil Robertson
- Moral: all laid up classics should be given a chance to start, run, change gears, and brake once every two or three months.
- Seized brakes and a clutch drive plate glued to the flywheel are common problems in vehicles left unattended.
- And flats on tyres.
- Laurence Glenn
- Bowmaker and run long enough to get warm so all condensation has time to evaporate off.
- Robert Bothwell
- In another Group my friend Vincent Stock advised this was the product to use for sealing inside sumps.

- Norman Julian
- Interesting!
- Thanks Robert!
- Norman Julian 16 Mar
- The last thing I wanted to take off in this area is this crossmember.
- It looks a little rusty and dirty and as I'm going along with this project I can see where I have been.
- There are 5 x 7/16" hex head nuts and bolts on either side.
- The ones down the bottom were interfering with front spring carrier bolts going in a different direction so it was hard to get any sort of spanner in there so I managed to get all but one off.
- I cut it off and then this crossmember came off.
- Another reason I wanted it off was to have a closer examination of the tube after 80 years of carrying such a heavy engine.
- There are before and after shots of it being cleaned up.
- It is in very good condition.
- Even after a solid piece of rubber sitting on it forever.


- Gregor Neil Robertson
- Terrific engineering.
- Getting it back in position may be difficult.
- Hence the hammer blows when originally repositioned.
- And with the nut and bolt securing it, how will you be able to refit the really inaccessible one if thereís no room?
- Norman Julian
- Gregor Neil Robertson
- I put it back in position with no lusty blows
- Norman Julian 16 Mar
- I know it was a million years ago when last in service but shoddy workmanship really annoys me.
- When I put this crossmember back on I noticed the grease nipple on the off side to grease the front spring.
- It looks like it has been hit with a hammer.
- The one on the nearside is gone.
- I took a picture of the generator and that nipple cap has gone as well.
- Back to the crossmember there are that many hammer blows in it that you would have to wonder why.
- The bolts holding the crossmember are different sizes and different nut configurations.
- Not I'd bet what she came out with.


- Gregor Neil Robertson
- Great photos Norman although Iím lost with the first one.
- You always manage to throw good light on the subjects.
- As a one time BBC cameraman I do appreciate the clarity of your photos.
- Norman Julian
- Gregor Neil Robertson see the thread on the side.
- It is suppose to have a cap on there.
- You fill the tube with grease and the screw on cap under pressure pushes the grease down the tube.
- Gregor Neil Robertson
- Norman Julian got it thanks Norman.
- Norman Julian 17 Mar
- The cross member is a lot easier now to take out.
- A general cleanup and paint.
- A new engine mount with 2 new mounting bolts.
- A fresh look.


- Gregor Neil Robertson
- A great improvement.
- So good to see major progress!
- Dennis Boros
- Itís only a relatively small part in the overall scheme of things, but the transformation is remarkable!
- A job well done!
- Norman Julian 18 Mart
- I took this all apar again this morning to drill the split ring holes near the end of the thread, so as to not have nuts working their way down and falling off.
- Because there is no real guide into where the holes should go I averaged out where they were located on the old bolts. Both original bolts had their split ring holes in a different position.
- I reckon that if there isn't enough tension where I have mine I can just add a spacer or 2 to each bolt below the rectangular plate then put the nut back on and replace the split ring.
- The other thing I did was to paint the components.
- When I cleaned all the road dirt and surface rust it was hard to know if corrosion would come back.
- After all the rain we have had in recent times moisture in the air created surface rust again.
- I decided to clean the surface rust off and paint them all.
- Hopefully they will last a long time.


- Charles Shipway
- Norm I love watching restoration work being done
- Having boy hood reminders of how methods were then the use of tools that have almost disappeared now
- The manual effort and expertise displayed by committed men producing important parts for machinery and more
- Norman Julian 21 Mar
- The sump has be thoroughly cleaned.
- I sent the back part of the sump away to get washed and bead blasted.
- Both are now ready to go back on

- Norman Julian 22 Mar
- No wonder pommy vehicles leak oil.
- Can anyone see what someone has done here.
- I have given you enough clues.
- Apart from that I have made new studs where required and retapped all the rest as well as the holes.
- It's a shame this wont be seen.
- It came up pretty well.


- Pablo E. Laredo
- Bolts are expensive, drilling and tapping holes doubly so, bean counter engineering at it's finest ;-)
- Gregor Neil Robertson
- Canít spot any modifications and itís looking superb, esp the filter!
- Norman Julian
- There are 3 holes tapped all the way through to the upper part of the sump.
- Now oil will soak through and around the threads and out onto the floor
- Pablo E. Laredo
- Locktite will alleviate the seepage, but you have to let it set first.
- Carle Gregory
- I was gunna say more joins so more places for oil to seep out of
- Steve Hardie
- My Dad Has a Austin Healey and it has had this problem since day dot.
- He blames the gaskets but with good cork and som gasket goo it works for Him
- Norman Julian 23 Mar
- I have cleaned up the oil strainer and reinstalled it and I was wondering how to deal with the 3 bolt holes going all the way through to the upper sump area.
- I thought about a few things and decided to lace the thread of each bolt with anti seize paint.
- I'm thinking that it may seal the threads.
- I don't want to use gasket sealant just in case it breaks down and becomes a nuisance in the sump.
- The viscosity of oil being a lot thicker than water, the anti seize should work well.


- Charles Shipway
- After reading your comment and thinking about it the logic you put forward is the way to go in my option Norm Go for it youíve got nothing to loose
- Brian Blunt
- "Aviation Jointing Compound" is readily available.
- It provides a good seal, but doesn't set.
- Norman Julian
- Knowledgeable people out there!
- Cameron McFadyen
- I can guarantee that anti sieze will not seal oil in.
- Norman Julian
- Probably but the thread in all 3 cases was below the hole you can see by about 4mm.
- I then filled that hole with a dob of gasket sealer.
- Then on the head side I put a fibre washer under the head.
- I remember when I took off the bottom part of the sump, I didn't notice any residual oil forming around the head of the bolt.
- The threads are not a sloppy fit so that in itself could lock the oil out.
- Cameron McFadyen
- I can't remember the number, but loctite do a sealent perfect for oil and sumps
- Norman Julian 24 Mar
- Last pictures and updates on this thing.
- I wasn't happy with what I did yesterday so apart it came.
- The sealant was still soft this morning which sent alarm bells so when I took it apart it didn't stick properly to the main body section.
- My fault for not cleaning it enough.
- Porous metals like Aluminium oil soaks in well and takes effort to clean it well enough for sealant.
- With gaskets it isn't so critical.
- The main sump was meticulously cleaned by machine whereas the big one was cleaned by me.
- After a few more cleaning efforts on the sealant face it was fine.
- The main reason the gasket sealant didn't work though was probably it was old.
- I got some fresh stuff as well as some thread sealer and did it properly.
- After about 1/2 hr the silicone formed a skin which the older stuff was suppose to have done in the first place.
- After placing a good coating of silicone and bolting it together and seeing it coming out from all sides, I cleaned up the inside and left the outside till it was hard enough to use the knife on.


- Pablo E. Laredo
- I find "Brake Cleaner" works well to leave a dry surface for silastic to stick.
- Calum Melrose
- Pablo E. Laredo got there before me.
- Pump dispenser and brake cleaner, game changer
- Calum Melrose Hubs, everything, was cleaned and then washed with brake cleaner, new bearings were washed on brake cleaner too before being packed
- https://www.flickr.com/photos/calummelrose/49687087668/
- Norman Julian 25 Mar
- The things you find!
- Firstly I had to make a new stud to hold this oil filter pipe onto the engine.
- I also took the gasket off that separates the pipe and the engine.
- Have a look at the gasket.
- This is the 4th thing I found that isn't really acceptable.
- The engine oil is suppose to go through this pipe as it circulates around the engine.
- Now this gasket has the hole stamped but hasn't been cleared.
- So in relation to this entire unit there were 3 studs out of 11 not there.
- These 3 studs you can see, the one on the right was made from a bolt I had with that odd size thread on one end.


- Allan Kent
- looks like the oil pressure was trying to force its way past the gasket by the indentation on one side the oil filter system must have been inoperative ��♂️
- Pablo E. Laredo
- Poor ol'bus, must of had a few careless "mechanics" fettling her back in the day.
- If I were a paranoid sod, I'd be scrutinizing just about everything that can come apart.
- You have uncovered so many dark secrets already, would not surprise me if you found more .
- Norman Julian 29 Mar
- Today I have been concentrating on the main injector lines and the leak of main line and pipes.
- It's good that most are copper.
- The one that I told you about a little while ago that was broken was actually a braze failure where it joins onto the flared joint.
- I cleaned it up and rejoined it.
- I don't possess a brazing kit so I tried soldering it.
- Hope it holds.
- I checked all the pipes for blockages by blowing through them and wouldn't you know it the pipe I repaired was blocked (it was blocked before I repaired it).
- I used a bit of copper wire I had here to clear it.


- Robert Stevenson
- Solder may work for a while, if it isnt on the pressurised side of the pump.
- My old mate mechanic years ago said that if you put your hand in the way of a blown pressurised line, you would have diesel injected into your flesh.
- Not a very nice thing to happen.
- Norman Julian
- Robert Stevenson it's not the main injector pipe line.
- All these pipes are basically the return to the fuel tank lines.
- Chris Dempsey
- Did the patient survive the operation looking at that on the bench
- Norman Julian
- It was critical but now as healthy as a horse
- Garry Macoid
- Snap, same thing as I was doing, boy they made the drain pipes from light gauge tubing.
- Redid mine in 3/16th steel brake pipe, soldered up nicely.
This site is hosted on
Crazy Domains & Hosting  Unlimited Web Hosting |
Last updated April 2020 |
This web site may contain Copyright material If you find any problems with the site, please email the Web Editor  |